

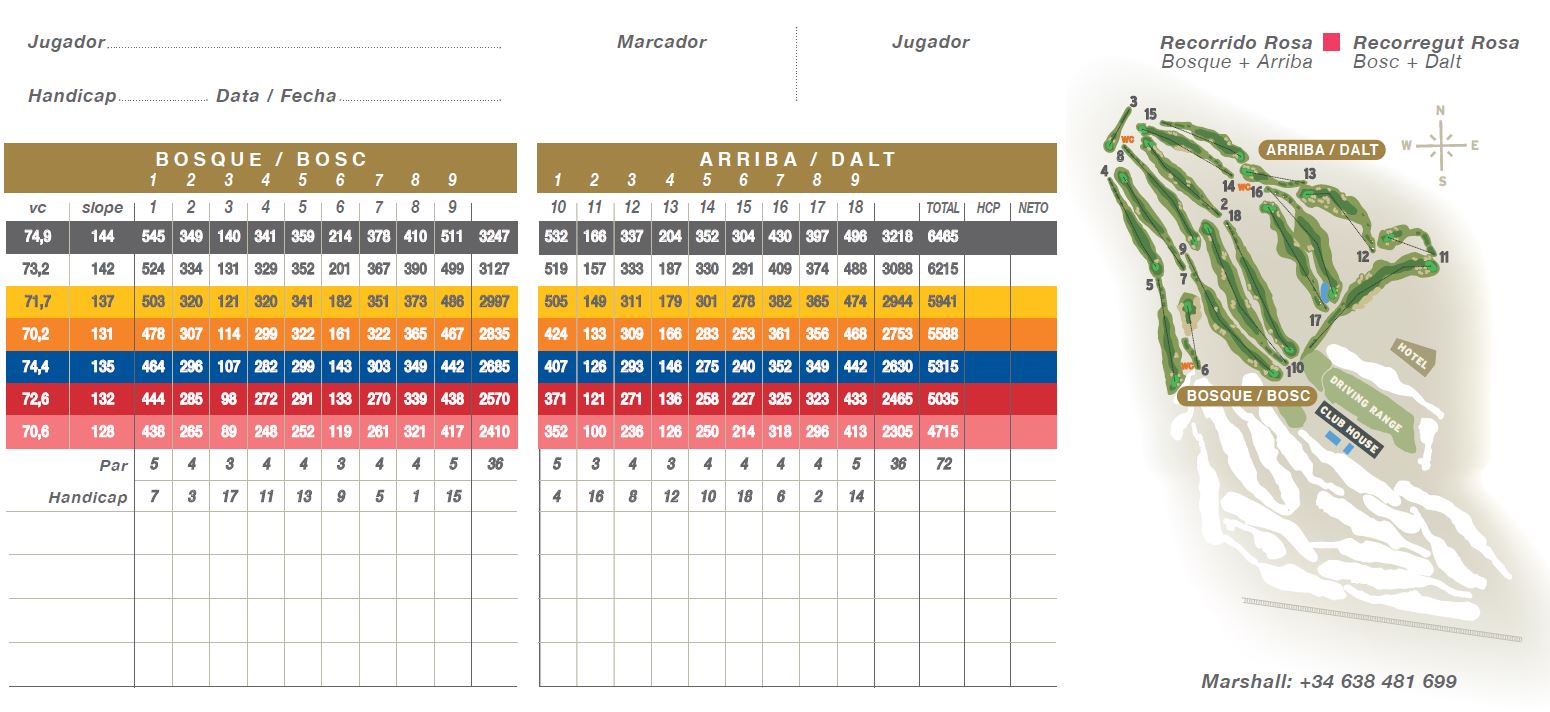
HOLE BY HOLE

PINK COURSE
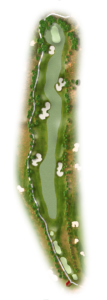
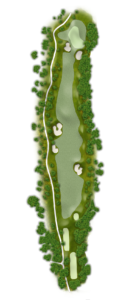
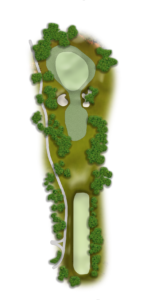
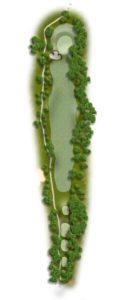
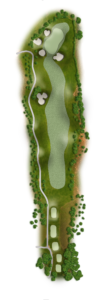
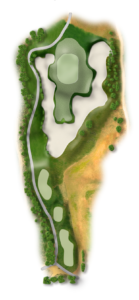
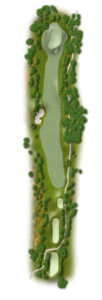
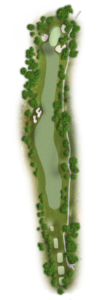
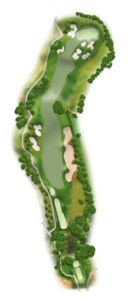
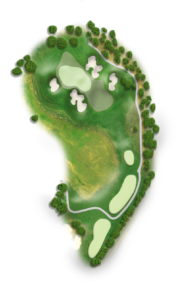
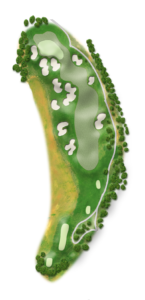
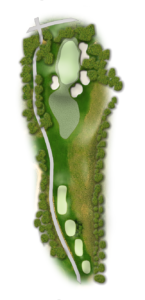
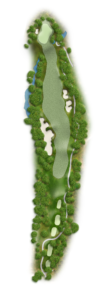
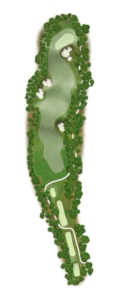
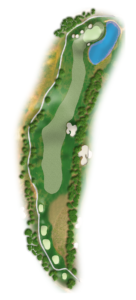
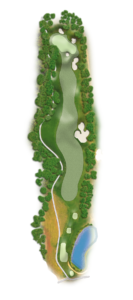
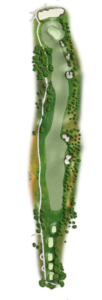
The Pink course is one of the most enjoyable layouts – and course designer Greg Norman’s favourite. It starts with a narrow and very technical first nine holes and a demanding second nine where recovery shots play a key role in ensuring a good score. The long par-three 6th and the always-fearsome 17th are the most outstanding holes on this course. The daunting par-three 6th leaves few players unscathed. The high, volcano-shaped green bounces any shot that is not spot-on to the surrounding waste bunker. This hole, one of the course’s most memorable, will leave lasting memories. The 17th is a tough uphill par four where the tee shot is once again key to posting a good score. The bunker on the right of the drive’s descent is one of the most frequented areas of the course as players are forced to avoid the hazard running along the entire left side of the hole. The semi-blind green approach requires a high, well-directed flight to avoid the bunkers at the front and rear of the green, leaving a long putt on its fast surface. Perhaps one of the course’s most complicated holes is the 8th, which is again surrounded by trees on both sides. It takes a long, well-centred tee shot to minimise the distance of the approach shot to a small green well defended by three bunkers and the surrounding pines.
Course distance: 6.465 meters
#4 golf course in Spain by
![]()
Tab Content
| Distance | Par | Handicap |
|---|---|---|
| 545 | 5 | 7 |
| 524 | 5 | 7 |
| 503 | 5 | 7 |
| 478 | 5 | 7 |
| 464 | 5 | 7 |
| 444 | 5 | 7 |
| 438 | 5 | 7 |
| Distance | Par | Handicap |
|---|---|---|
| 349 | 4 | 3 |
| 334 | 4 | 3 |
| 320 | 4 | 3 |
| 307 | 4 | 3 |
| 296 | 4 | 3 |
| 285 | 4 | 3 |
| 265 | 4 | 3 |
| Distance | Par | Handicap |
|---|---|---|
| 140 | 3 | 17 |
| 131 | 3 | 17 |
| 121 | 3 | 17 |
| 114 | 3 | 17 |
| 107 | 3 | 17 |
| 98 | 3 | 17 |
| 89 | 3 | 17 |
| Distance | Par | Handicap |
|---|---|---|
| 341 | 4 | 11 |
| 329 | 4 | 11 |
| 320 | 4 | 11 |
| 299 | 4 | 11 |
| 282 | 4 | 11 |
| 272 | 4 | 11 |
| 248 | 4 | 11 |
| Distance | Par | Handicap |
|---|---|---|
| 359 | 4 | 13 |
| 352 | 4 | 13 |
| 341 | 4 | 13 |
| 322 | 4 | 13 |
| 299 | 4 | 13 |
| 291 | 4 | 13 |
| 252 | 4 | 13 |
| Distance | Par | Handicap |
|---|---|---|
| 214 | 3 | 9 |
| 201 | 3 | 9 |
| 182 | 3 | 9 |
| 161 | 3 | 9 |
| 143 | 3 | 9 |
| 133 | 3 | 9 |
| 119 | 3 | 9 |
| Distance | Par | Handicap |
|---|---|---|
| 378 | 4 | 5 |
| 367 | 4 | 5 |
| 351 | 4 | 5 |
| 322 | 4 | 5 |
| 303 | 4 | 5 |
| 270 | 4 | 5 |
| 261 | 4 | 5 |
| Distance | Par | Handicap |
|---|---|---|
| 410 | 4 | 1 |
| 390 | 4 | 1 |
| 373 | 4 | 1 |
| 365 | 4 | 1 |
| 349 | 4 | 1 |
| 339 | 4 | 1 |
| 321 | 4 | 1 |
| Distance | Par | Handicap |
|---|---|---|
| 511 | 5 | 15 |
| 499 | 5 | 15 |
| 486 | 5 | 15 |
| 467 | 5 | 15 |
| 442 | 5 | 15 |
| 438 | 5 | 15 |
| 417 | 5 | 15 |

| Distance | Par | Handicap |
|---|---|---|
| 532 | 5 | 4 |
| 519 | 5 | 4 |
| 505 | 5 | 4 |
| 424 | 5 | 4 |
| 407 | 5 | 4 |
| 371 | 5 | 4 |
| 352 | 5 | 4 |
| Distance | Par | Handicap |
|---|---|---|
| 166 | 3 | 16 |
| 157 | 3 | 16 |
| 149 | 3 | 16 |
| 133 | 3 | 16 |
| 126 | 3 | 16 |
| 121 | 3 | 16 |
| 100 | 3 | 16 |
| Distance | Par | Handicap |
|---|---|---|
| 337 | 4 | 8 |
| 333 | 4 | 8 |
| 311 | 4 | 8 |
| 309 | 4 | 8 |
| 293 | 4 | 8 |
| 271 | 4 | 8 |
| 236 | 4 | 8 |
| Distance | Par | Handicap |
|---|---|---|
| 204 | 3 | 12 |
| 187 | 3 | 12 |
| 179 | 3 | 12 |
| 166 | 3 | 12 |
| 146 | 3 | 12 |
| 136 | 3 | 12 |
| 126 | 3 | 12 |
| Distance | Par | Handicap |
|---|---|---|
| 352 | 4 | 10 |
| 330 | 4 | 10 |
| 301 | 4 | 10 |
| 283 | 4 | 10 |
| 275 | 4 | 10 |
| 258 | 4 | 10 |
| 250 | 4 | 10 |
| Distance | Par | Handicap |
|---|---|---|
| 331 | 4 | 18 |
| 291 | 4 | 18 |
| 278 | 4 | 18 |
| 253 | 4 | 18 |
| 240 | 4 | 18 |
| 227 | 4 | 18 |
| 214 | 4 | 18 |
| Distance | Par | Handicap |
|---|---|---|
| 430 | 4 | 6 |
| 409 | 4 | 6 |
| 382 | 4 | 6 |
| 361 | 4 | 6 |
| 352 | 4 | 6 |
| 325 | 4 | 6 |
| 318 | 4 | 6 |
| Distance | Par | Handicap |
|---|---|---|
| 397 | 4 | 2 |
| 374 | 4 | 2 |
| 365 | 4 | 2 |
| 356 | 4 | 2 |
| 349 | 4 | 2 |
| 323 | 4 | 2 |
| 296 | 4 | 2 |
| Distance | Par | Handicap |
|---|---|---|
| 496 | 5 | 14 |
| 488 | 5 | 14 |
| 474 | 5 | 14 |
| 468 | 5 | 14 |
| 442 | 5 | 14 |
| 433 | 5 | 14 |
| 413 | 5 | 14 |
| HOLES | 1 | 2 | 3 | 4 | 5 | 6 | 7 | 8 | 9 | IDA | 10 | 11 | 12 | 13 | 14 | 15 | 16 | 17 | 18 | VTA | TOT | V.C. | V.S. | |
|---|---|---|---|---|---|---|---|---|---|---|---|---|---|---|---|---|---|---|---|---|---|---|---|---|
| Negro | 545 | 349 | 140 | 341 | 359 | 214 | 378 | 410 | 511 | 3247 | 532 | 166 | 337 | 204 | 352 | 331 | 430 | 397 | 496 | 3218 | 6465 | 74.70 | 137 | |
| Rojo | 444 | 285 | 98 | 272 | 291 | 133 | 270 | 339 | 438 | 2570 | 371 | 121 | 271 | 136 | 258 | 227 | 325 | 323 | 433 | 2465 | 5035 | 72.50 | 126 | |
| Blanco | 524 | 334 | 131 | 329 | 352 | 201 | 367 | 390 | 499 | 3127 | 501 | 157 | 333 | 187 | 330 | 291 | 409 | 374 | 488 | 3070 | 6197 | 73.80 | 136 | |
| Amarillo | 503 | 320 | 121 | 320 | 341 | 182 | 351 | 373 | 486 | 2997 | 470 | 149 | 311 | 179 | 301 | 278 | 382 | 365 | 474 | 2909 | 5906 | 71.90 | 131 | |
| Naranja | 478 | 307 | 114 | 299 | 322 | 161 | 322 | 365 | 467 | 2835 | 424 | 133 | 309 | 166 | 283 | 253 | 361 | 356 | 468 | 2753 | 5588 | 70.20 | 127 | |
| Azul | 464 | 296 | 107 | 282 | 299 | 143 | 303 | 349 | 442 | 2685 | 407 | 126 | 293 | 146 | 275 | 240 | 352 | 349 | 442 | 2630 | 5315 | 74.40 | 128 | |
| Rosa | 438 | 265 | 89 | 248 | 252 | 119 | 261 | 321 | 417 | 2410 | 352 | 100 | 236 | 126 | 250 | 214 | 318 | 296 | 413 | 2305 | 4715 | 70.30 | 124 | |
| Par | 5 | 4 | 3 | 4 | 4 | 3 | 4 | 4 | 5 | 36 | 5 | 3 | 4 | 3 | 4 | 4 | 4 | 4 | 5 | 36 | 72 | |||
| HCP | 7 | 3 | 17 | 11 | 13 | 9 | 5 | 1 | 15 | 4 | 16 | 8 | 12 | 10 | 18 | 6 | 2 | 14 |
Tab Content
1
Accordion Content
2
| Distance | Par | Handicap |
|---|---|---|
| 349 | 4 | 3 |
| 334 | 4 | 3 |
| 320 | 4 | 3 |
| 307 | 4 | 3 |
| 296 | 4 | 3 |
| 285 | 4 | 3 |
| 265 | 4 | 3 |
3
| Distance | Par | Handicap |
|---|---|---|
| 140 | 3 | 17 |
| 131 | 3 | 17 |
| 121 | 3 | 17 |
| 114 | 3 | 17 |
| 107 | 3 | 17 |
| 98 | 3 | 17 |
| 89 | 3 | 17 |
4
| Distance | Par | Handicap |
|---|---|---|
| 341 | 4 | 11 |
| 329 | 4 | 11 |
| 320 | 4 | 11 |
| 299 | 4 | 11 |
| 282 | 4 | 11 |
| 272 | 4 | 11 |
| 248 | 4 | 11 |
5
| Distance | Par | Handicap |
|---|---|---|
| 359 | 4 | 13 |
| 352 | 4 | 13 |
| 341 | 4 | 13 |
| 322 | 4 | 13 |
| 299 | 4 | 13 |
| 291 | 4 | 13 |
| 252 | 4 | 13 |
6
| Distance | Par | Handicap |
|---|---|---|
| 214 | 3 | 9 |
| 201 | 3 | 9 |
| 182 | 3 | 9 |
| 161 | 3 | 9 |
| 143 | 3 | 9 |
| 133 | 3 | 9 |
| 119 | 3 | 9 |
7
| Distance | Par | Handicap |
|---|---|---|
| 378 | 4 | 5 |
| 367 | 4 | 5 |
| 351 | 4 | 5 |
| 322 | 4 | 5 |
| 303 | 4 | 5 |
| 270 | 4 | 5 |
| 261 | 4 | 5 |
8
| Distance | Par | Handicap |
|---|---|---|
| 410 | 4 | 1 |
| 390 | 4 | 1 |
| 373 | 4 | 1 |
| 365 | 4 | 1 |
| 349 | 4 | 1 |
| 339 | 4 | 1 |
| 321 | 4 | 1 |
9
| Distance | Par | Handicap |
|---|---|---|
| 511 | 5 | 15 |
| 499 | 5 | 15 |
| 486 | 5 | 15 |
| 467 | 5 | 15 |
| 442 | 5 | 15 |
| 438 | 5 | 15 |
| 417 | 5 | 15 |
10
| Distance | Par | Handicap |
|---|---|---|
| 532 | 5 | 4 |
| 519 | 5 | 4 |
| 505 | 5 | 4 |
| 424 | 5 | 4 |
| 407 | 5 | 4 |
| 371 | 5 | 4 |
| 352 | 5 | 4 |
11
| Distance | Par | Handicap |
|---|---|---|
| 166 | 3 | 16 |
| 157 | 3 | 16 |
| 149 | 3 | 16 |
| 133 | 3 | 16 |
| 126 | 3 | 16 |
| 121 | 3 | 16 |
| 100 | 3 | 16 |
12
| Distance | Par | Handicap |
|---|---|---|
| 337 | 4 | 8 |
| 333 | 4 | 8 |
| 311 | 4 | 8 |
| 309 | 4 | 8 |
| 293 | 4 | 8 |
| 271 | 4 | 8 |
| 236 | 4 | 8 |
13
| Distance | Par | Handicap |
|---|---|---|
| 204 | 3 | 12 |
| 187 | 3 | 12 |
| 179 | 3 | 12 |
| 166 | 3 | 12 |
| 146 | 3 | 12 |
| 136 | 3 | 12 |
| 126 | 3 | 12 |
14
| Distance | Par | Handicap |
|---|---|---|
| 352 | 4 | 10 |
| 330 | 4 | 10 |
| 301 | 4 | 10 |
| 283 | 4 | 10 |
| 275 | 4 | 10 |
| 258 | 4 | 10 |
| 250 | 4 | 10 |
15
| Distance | Par | Handicap |
|---|---|---|
| 331 | 4 | 18 |
| 291 | 4 | 18 |
| 278 | 4 | 18 |
| 253 | 4 | 18 |
| 240 | 4 | 18 |
| 227 | 4 | 18 |
| 214 | 4 | 18 |
16
| Distance | Par | Handicap |
|---|---|---|
| 430 | 4 | 6 |
| 409 | 4 | 6 |
| 382 | 4 | 6 |
| 361 | 4 | 6 |
| 352 | 4 | 6 |
| 325 | 4 | 6 |
| 318 | 4 | 6 |
17
| Distance | Par | Handicap |
|---|---|---|
| 397 | 4 | 2 |
| 374 | 4 | 2 |
| 365 | 4 | 2 |
| 356 | 4 | 2 |
| 349 | 4 | 2 |
| 323 | 4 | 2 |
| 296 | 4 | 2 |
18
| Distance | Par | Handicap |
|---|---|---|
| 496 | 5 | 14 |
| 488 | 5 | 14 |
| 474 | 5 | 14 |
| 468 | 5 | 14 |
| 442 | 5 | 14 |
| 433 | 5 | 14 |
| 413 | 5 | 14 |
Scorecard
| HOLES | 1 | 2 | 3 | 4 | 5 | 6 | 7 | 8 | 9 | IDA | 10 | 11 | 12 | 13 | 14 | 15 | 16 | 17 | 18 | VTA | TOT | V.C. | V.S. | |
|---|---|---|---|---|---|---|---|---|---|---|---|---|---|---|---|---|---|---|---|---|---|---|---|---|
| Negro | 545 | 349 | 140 | 341 | 359 | 214 | 378 | 410 | 511 | 3247 | 532 | 166 | 337 | 204 | 352 | 331 | 430 | 397 | 496 | 3218 | 6465 | 74.70 | 137 | |
| Rojo | 444 | 285 | 98 | 272 | 291 | 133 | 270 | 339 | 438 | 2570 | 371 | 121 | 271 | 136 | 258 | 227 | 325 | 323 | 433 | 2465 | 5035 | 72.50 | 126 | |
| Blanco | 524 | 334 | 131 | 329 | 352 | 201 | 367 | 390 | 499 | 3127 | 501 | 157 | 333 | 187 | 330 | 291 | 409 | 374 | 488 | 3070 | 6197 | 73.80 | 136 | |
| Amarillo | 503 | 320 | 121 | 320 | 341 | 182 | 351 | 373 | 486 | 2997 | 470 | 149 | 311 | 179 | 301 | 278 | 382 | 365 | 474 | 2909 | 5906 | 71.90 | 131 | |
| Naranja | 478 | 307 | 114 | 299 | 322 | 161 | 322 | 365 | 467 | 2835 | 424 | 133 | 309 | 166 | 283 | 253 | 361 | 356 | 468 | 2753 | 5588 | 70.20 | 127 | |
| Azul | 464 | 296 | 107 | 282 | 299 | 143 | 303 | 349 | 442 | 2685 | 407 | 126 | 293 | 146 | 275 | 240 | 352 | 349 | 442 | 2630 | 5315 | 74.40 | 128 | |
| Rosa | 438 | 265 | 89 | 248 | 252 | 119 | 261 | 321 | 417 | 2410 | 352 | 100 | 236 | 126 | 250 | 214 | 318 | 296 | 413 | 2305 | 4715 | 70.30 | 124 | |
| Par | 5 | 4 | 3 | 4 | 4 | 3 | 4 | 4 | 5 | 36 | 5 | 3 | 4 | 3 | 4 | 4 | 4 | 4 | 5 | 36 | 72 | |||
| HCP | 7 | 3 | 17 | 11 | 13 | 9 | 5 | 1 | 15 | 4 | 16 | 8 | 12 | 10 | 18 | 6 | 2 | 14 |