

HOLE BY HOLE
YELLOW COURSE
Tab Content
| Distance | Par | Handicap |
|---|---|---|
| 389 | 4 | 6 |
| 371 | 4 | 6 |
| 362 | 4 | 6 |
| 340 | 4 | 6 |
| 322 | 4 | 6 |
| 320 | 4 | 6 |
| 289 | 4 | 6 |
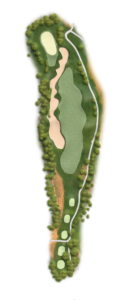
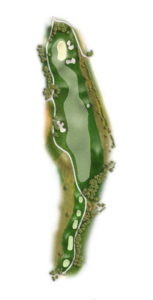
A par four that runs gently downhill, with bunkers to the left and the right along the drop of the tee shot that need to be avoided. The second shot is complicated, with a narrow, downward sloping green running diagonal to the fairway and flanked by two bunkers on its right shoulder.

| Distance | Par | Handicap |
|---|---|---|
| 168 | 3 | 16 |
| 144 | 3 | 16 |
| 137 | 3 | 16 |
| 129 | 3 | 16 |
| 121 | 3 | 16 |
| 110 | 3 | 16 |
| 103 | 3 | 16 |
Downhill par three with a broad, well-defended green. Distance isn’t a problem here, but players need to get close to the flag to assure two putts. Keeping at par is tough if you overshoot the green.

| Distance | Par | Handicap |
|---|---|---|
| 345 | 4 | 18 |
| 323 | 4 | 18 |
| 305 | 4 | 18 |
| 300 | 4 | 18 |
| 274 | 4 | 18 |
| 251 | 4 | 18 |
| 245 | 4 | 18 |
Short par four, where a short second shot to the green is possible using a 3 wood or even an iron to tee off. A confidence-building hole, you should still bear in mind the green’s slight incline.
| Distance | Par | Handicap |
|---|---|---|
| 491 | 5 | 14 |
| 468 | 5 | 14 |
| 442 | 5 | 14 |
| 427 | 5 | 14 |
| 398 | 5 | 14 |
| 378 | 5 | 14 |
| 346 | 5 | 14 |
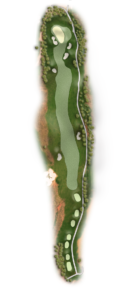
Par five where big hitters can reach the green in two shots, but which requires great accuracy both on the tee shot and second shot, as the entire length of the fairway is lined by bunkers to left and right. The green can be tricky if you overshoot the flag.
| Distance | Par | Handicap |
|---|---|---|
| 350 | 4 | 12 |
| 337 | 4 | 12 |
| 303 | 4 | 12 |
| 288 | 4 | 12 |
| 267 | 4 | 12 |
| 246 | 4 | 12 |
| 216 | 4 | 12 |
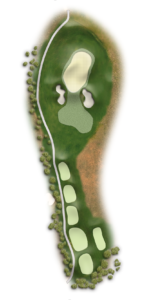
Short par four requiring high precision, both at the tee because of the bunkers to both sides of the drive’s drop and on the second shot, which in spite of requiring a short iron takes great skill to reach the high green protected by two bunkers in front and a hollow at the end.

| Distance | Par | Handicap |
|---|---|---|
| 186 | 3 | 8 |
| 176 | 3 | 8 |
| 163 | 3 | 8 |
| 153 | 3 | 8 |
| 138 | 3 | 8 |
| 118 | 3 | 8 |
| 96 | 3 | 8 |
Excellent and difficult par three requiring a high shot with a mid- to long iron to take the ball to a green set higher than the tee and running diagonally, protected by deep bunkers on both sides. Making par is quite a challenge!
| Distance | Par | Handicap |
|---|---|---|
| 390 | 4 | 4 |
| 383 | 4 | 4 |
| 366 | 4 | 4 |
| 340 | 4 | 4 |
| 333 | 4 | 4 |
| 314 | 4 | 4 |
| 306 | 4 | 4 |
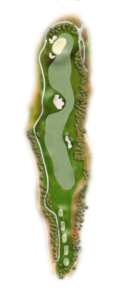
Straight, feasible par four with a relatively comfortable tee shot and requiring a mid- to short iron for the second shot to a long green protected to the right and left by bunkers and a drop-off on its right edge.

| Distancia | Par | Handicap |
|---|---|---|
| 493 | 5 | 10 |
| 407 | 4 | 2 |
| 386 | 4 | 2 |
| 363 | 4 | 2 |
| 355 | 4 | 2 |
| 341 | 4 | 2 |
| 333 | 4 | 2 |
| 314 | 4 | 2 |
Uphill par four requiring a well-placed tee shot slightly to the left of centre and a good second swing uphill using a mid-iron to a green protected by bunkers along its left edge. It’s advisable to stay to the right in case you miss the green – a good approach from that side can save the par for the hole.
| Distance | Par | Handicap |
|---|---|---|
| 493 | 5 | 10 |
| 472 | 5 | 10 |
| 460 | 5 | 10 |
| 439 | 5 | 10 |
| 428 | 5 | 10 |
| 4172 | 5 | 10 |
| 397 | 5 | 10 |
Achievable par five where big hitters can reach the green in two shots, but which requires high, long drives due to the height of the green and the bunker on the left side and the hollow to the right. It’s important not to stray away from the fairway, especially to the right. The rolling green is split into three distinct areas.

| Distance | Par | Handicap |
|---|---|---|
| 416 | 4 | 5 |
| 395 | 4 | 5 |
| 387 | 4 | 5 |
| 362 | 4 | 5 |
| 342 | 4 | 5 |
| 332 | 4 | 5 |
| 314 | 4 | 5 |
Long par four requiring a powerful drive, taking care not to go off the fairway to the right and land in the hazard that runs the length of the hole. The second shot requires a long iron to reach a broad green with a large bunker to the left and a waste area to the right. Making par is quite a challenge!

| Distance | Par | Handicap |
|---|---|---|
| 525 | 4 | 15 |
| 501 | 4 | 15 |
| 470 | 4 | 15 |
| 458 | 4 | 15 |
| 447 | 4 | 15 |
| 422 | 4 | 15 |
| 416 | 4 | 15 |
Uphill par five, the green can be reached in two shots by hard hitters. Drive required to get past the waste area to the right, and a good second shot will usually leave players with a blind approach given the huge bunkers on the right side of the green. The green runs diagonally, making for a hard putt if your approach passes the flag.

| Distance | Par | Handicap |
|---|---|---|
| 188 | 3 | 13 |
| 172 | 3 | 13 |
| 155 | 3 | 13 |
| 140 | 3 | 13 |
| 122 | 3 | 13 |
| 105 | 3 | 13 |
| 93 | 3 | 13 |
A magnificent and difficult par three with a slight downhill slope. A long iron will be needed to reach a huge green, protected to the right by bunkers and to the left by a grove of trees. Make sure your two putts come very close to the flag due to the green’s dimensions.

| Distance | Par | Handicap |
|---|---|---|
| 402 | 4 | 9 |
| 378 | 4 | 9 |
| 356 | 4 | 9 |
| 335 | 4 | 9 |
| 328 | 4 | 9 |
| 312 | 4 | 9 |
| 304 | 4 | 9 |
Par four requiring power and accuracy. The tee shot is flanked by bunkers to right and left, and you need a mid-iron for the second shot to land you in a crosswise green that is protected by an array of bunkers in front and a dense forest behind. But to do so, your approach shot must be high and well-placed for the ball to stay on the green.

| Distance | Par | Handicap |
|---|---|---|
| 425 | 4 | 11 |
| 393 | 4 | 11 |
| 376 | 4 | 11 |
| 352 | 4 | 11 |
| 344 | 4 | 11 |
| 326 | 4 | 11 |
| 300 | 4 | 11 |
Par four with a slight dogleg to the left. The tee shot must be deep, followed by a mid- or short iron to an elongated green flanked to the right by two bunkers.
| Distance | Par | Handicap |
|---|---|---|
| 428 | 4 | 1 |
| 412 | 4 | 1 |
| 387 | 4 | 1 |
| 365 | 4 | 1 |
| 357 | 4 | 1 |
| 339 | 4 | 1 |
| 328 | 4 | 1 |
One of the course’s hardest par fours. The tee shot is long and downhill, protected by a bunker to the left and thick rough to the right. The approach leads to a slightly upward sloping green flanked by two bunkers to right and left, requiring height and accuracy with a mid- or long iron.
| Distance | Par | Handicap |
|---|---|---|
| 498 | 5 | 7 |
| 483 | 5 | 7 |
| 468 | 5 | 7 |
| 449 | 5 | 7 |
| 428 | 5 | 7 |
| 387 | 5 | 7 |
| 377 | 5 | 7 |
A great par five, where a good deal of strategy is needed. The tee shot to the right has to avoid the bunker on the left side. The second shot requires a long iron or wood to place the ball 50 or 60 yards from the green in order to approach it from above. The green is defended by bunkers to the front and back, and slopes from back to front.

| Distance | Par | Handicap |
|---|---|---|
| 146 | 3 | 17 |
| 141 | 3 | 17 |
| 126 | 3 | 17 |
| 119 | 3 | 17 |
| 106 | 3 | 17 |
| 98 | 3 | 17 |
| 90 | 3 | 17 |
Short par 3 with a broad green, where a good shot with a short iron can help you shave a point from your score. It’s best to not to miss the left on your approach.
| Distance | Par | Handicap |
|---|---|---|
| 426 | 4 | 3 |
| 409 | 4 | 3 |
| 386 | 4 | 3 |
| 372 | 4 | 3 |
| 347 | 4 | 3 |
| 323 | 4 | 3 |
| 301 | 4 | 3 |
Tremendous par four to finish. Perhaps the hardest hole in the course. The long, uphill hole requires a strong drive hugging the right side of the fairway, then a long iron to approach the long, crosswise green defended by a bunker on the right and a slight hollow on the left. Making par is quite a challenge!

| HOLES | 1 | 2 | 3 | 4 | 5 | 6 | 7 | 8 | 9 | IDA | 10 | 11 | 12 | 13 | 14 | 15 | 16 | 17 | 18 | VTA | TOT | V.C. | V.S. | |
|---|---|---|---|---|---|---|---|---|---|---|---|---|---|---|---|---|---|---|---|---|---|---|---|---|
| Negro | 389 | 168 | 345 | 491 | 350 | 186 | 390 | 407 | 493 | 3219 | 416 | 525 | 188 | 402 | 425 | 428 | 498 | 146 | 426 | 3454 | 6673 | 75.50 | 135 | |
| Blanco | 371 | 144 | 323 | 468 | 337 | 176 | 383 | 386 | 472 | 3060 | 395 | 501 | 172 | 378 | 393 | 412 | 483 | 141 | 409 | 3284 | 6344 | 73.70 | 131 | |
| Amarillo | 362 | 137 | 305 | 442 | 303 | 163 | 366 | 363 | 460 | 2901 | 387 | 470 | 155 | 356 | 376 | 387 | 468 | 126 | 386 | 3111 | 6012 | 71.90 | 126 | |
| Naranja | 340 | 129 | 300 | 427 | 288 | 153 | 340 | 355 | 439 | 2771 | 362 | 458 | 140 | 335 | 352 | 365 | 449 | 119 | 372 | 2952 | 5723 | 70.50 | 123 | |
| Azul | 332 | 121 | 274 | 398 | 267 | 138 | 333 | 341 | 428 | 2632 | 342 | 447 | 122 | 328 | 344 | 357 | 428 | 106 | 347 | 2821 | 5453 | 74.60 | 131 | |
| Rojo | 320 | 110 | 251 | 378 | 246 | 118 | 314 | 333 | 417 | 2487 | 332 | 422 | 105 | 312 | 326 | 339 | 387 | 98 | 323 | 2644 | 5131 | 72.70 | 128 | |
| Rosa | 289 | 103 | 245 | 346 | 216 | 96 | 306 | 314 | 397 | 2312 | 314 | 416 | 93 | 304 | 300 | 328 | 377 | 90 | 301 | 2523 | 4835 | 70.80 | 123 | |
| Par | 4 | 3 | 4 | 5 | 4 | 3 | 4 | 4 | 5 | 36 | 4 | 5 | 3 | 4 | 4 | 4 | 5 | 3 | 4 | 36 | 72 | |||
| HCP | 6 | 16 | 18 | 14 | 12 | 8 | 4 | 2 | 10 | 5 | 15 | 13 | 9 | 11 | 1 | 7 | 17 | 3 |
Tab Content
1
| Distance | Par | Handicap |
|---|---|---|
| 389 | 4 | 6 |
| 371 | 4 | 6 |
| 362 | 4 | 6 |
| 340 | 4 | 6 |
| 322 | 4 | 6 |
| 320 | 4 | 6 |
| 289 | 4 | 6 |
A par four that runs gently downhill, with bunkers to the left and the right along the drop of the tee shot that need to be avoided. The second shot is complicated, with a narrow, downward sloping green running diagonal to the fairway and flanked by two bunkers on its right shoulder.
2
| Distance | Par | Handicap |
|---|---|---|
| 168 | 3 | 16 |
| 144 | 3 | 16 |
| 137 | 3 | 16 |
| 129 | 3 | 16 |
| 121 | 3 | 16 |
| 110 | 3 | 16 |
| 103 | 3 | 16 |
Downhill par three with a broad, well-defended green. Distance isn’t a problem here, but players need to get close to the flag to assure two putts. Keeping at par is tough if you overshoot the green.
3
| Distance | Par | Handicap |
|---|---|---|
| 345 | 4 | 18 |
| 323 | 4 | 18 |
| 305 | 4 | 18 |
| 300 | 4 | 18 |
| 274 | 4 | 18 |
| 251 | 4 | 18 |
| 245 | 4 | 18 |
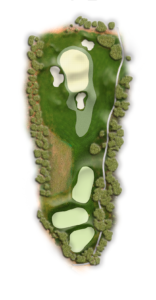
Short par four, where a short second shot to the green is possible using a 3 wood or even an iron to tee off. A confidence-building hole, you should still bear in mind the green’s slight incline.
4
| Distance | Par | Handicap |
|---|---|---|
| 491 | 5 | 14 |
| 468 | 5 | 14 |
| 442 | 5 | 14 |
| 427 | 5 | 14 |
| 398 | 5 | 14 |
| 378 | 5 | 14 |
| 346 | 5 | 14 |
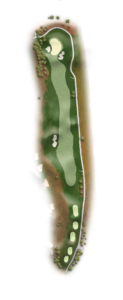
Par five where big hitters can reach the green in two shots, but which requires great accuracy both on the tee shot and second shot, as the entire length of the fairway is lined by bunkers to left and right. The green can be tricky if you overshoot the flag.
5
| Distance | Par | Handicap |
|---|---|---|
| 350 | 4 | 12 |
| 337 | 4 | 12 |
| 303 | 4 | 12 |
| 288 | 4 | 12 |
| 267 | 4 | 12 |
| 246 | 4 | 12 |
| 216 | 4 | 12 |
Short par four requiring high precision, both at the tee because of the bunkers to both sides of the drive’s drop and on the second shot, which in spite of requiring a short iron takes great skill to reach the high green protected by two bunkers in front and a hollow at the end.
6
| Distance | Par | Handicap |
|---|---|---|
| 186 | 3 | 8 |
| 176 | 3 | 8 |
| 163 | 3 | 8 |
| 153 | 3 | 8 |
| 138 | 3 | 8 |
| 118 | 3 | 8 |
| 96 | 3 | 8 |
Excellent and difficult par three requiring a high shot with a mid- to long iron to take the ball to a green set higher than the tee and running diagonally, protected by deep bunkers on both sides. Making par is quite a challenge!
7
| Distance | Par | Handicap |
|---|---|---|
| 390 | 4 | 4 |
| 383 | 4 | 4 |
| 366 | 4 | 4 |
| 340 | 4 | 4 |
| 333 | 4 | 4 |
| 314 | 4 | 4 |
| 306 | 4 | 4 |
Straight, feasible par four with a relatively comfortable tee shot and requiring a mid- to short iron for the second shot to a long green protected to the right and left by bunkers and a drop-off on its right edge.
8
| Distancia | Par | Handicap |
|---|---|---|
| 493 | 5 | 10 |
| 407 | 4 | 2 |
| 386 | 4 | 2 |
| 363 | 4 | 2 |
| 355 | 4 | 2 |
| 341 | 4 | 2 |
| 333 | 4 | 2 |
| 314 | 4 | 2 |
Uphill par four requiring a well-placed tee shot slightly to the left of centre and a good second swing uphill using a mid-iron to a green protected by bunkers along its left edge. It’s advisable to stay to the right in case you miss the green – a good approach from that side can save the par for the hole.
9
| Distance | Par | Handicap |
|---|---|---|
| 493 | 5 | 10 |
| 472 | 5 | 10 |
| 460 | 5 | 10 |
| 439 | 5 | 10 |
| 428 | 5 | 10 |
| 4172 | 5 | 10 |
| 397 | 5 | 10 |
Achievable par five where big hitters can reach the green in two shots, but which requires high, long drives due to the height of the green and the bunker on the left side and the hollow to the right. It’s important not to stray away from the fairway, especially to the right. The rolling green is split into three distinct areas.
10
| Distance | Par | Handicap |
|---|---|---|
| 416 | 4 | 5 |
| 395 | 4 | 5 |
| 387 | 4 | 5 |
| 362 | 4 | 5 |
| 342 | 4 | 5 |
| 332 | 4 | 5 |
| 314 | 4 | 5 |
Long par four requiring a powerful drive, taking care not to go off the fairway to the right and land in the hazard that runs the length of the hole. The second shot requires a long iron to reach a broad green with a large bunker to the left and a waste area to the right. Making par is quite a challenge!
11
| Distance | Par | Handicap |
|---|---|---|
| 525 | 4 | 15 |
| 501 | 4 | 15 |
| 470 | 4 | 15 |
| 458 | 4 | 15 |
| 447 | 4 | 15 |
| 422 | 4 | 15 |
| 416 | 4 | 15 |
Uphill par five, the green can be reached in two shots by hard hitters. Drive required to get past the waste area to the right, and a good second shot will usually leave players with a blind approach given the huge bunkers on the right side of the green. The green runs diagonally, making for a hard putt if your approach passes the flag.
12
| Distance | Par | Handicap |
|---|---|---|
| 188 | 3 | 13 |
| 172 | 3 | 13 |
| 155 | 3 | 13 |
| 140 | 3 | 13 |
| 122 | 3 | 13 |
| 105 | 3 | 13 |
| 93 | 3 | 13 |
A magnificent and difficult par three with a slight downhill slope. A long iron will be needed to reach a huge green, protected to the right by bunkers and to the left by a grove of trees. Make sure your two putts come very close to the flag due to the green’s dimensions.
13
| Distance | Par | Handicap |
|---|---|---|
| 402 | 4 | 9 |
| 378 | 4 | 9 |
| 356 | 4 | 9 |
| 335 | 4 | 9 |
| 328 | 4 | 9 |
| 312 | 4 | 9 |
| 304 | 4 | 9 |
Par four requiring power and accuracy. The tee shot is flanked by bunkers to right and left, and you need a mid-iron for the second shot to land you in a crosswise green that is protected by an array of bunkers in front and a dense forest behind. But to do so, your approach shot must be high and well-placed for the ball to stay on the green.
14
| Distance | Par | Handicap |
|---|---|---|
| 425 | 4 | 11 |
| 393 | 4 | 11 |
| 376 | 4 | 11 |
| 352 | 4 | 11 |
| 344 | 4 | 11 |
| 326 | 4 | 11 |
| 300 | 4 | 11 |
Par four with a slight dogleg to the left. The tee shot must be deep, followed by a mid- or short iron to an elongated green flanked to the right by two bunkers.
15
| Distance | Par | Handicap |
|---|---|---|
| 428 | 4 | 1 |
| 412 | 4 | 1 |
| 387 | 4 | 1 |
| 365 | 4 | 1 |
| 357 | 4 | 1 |
| 339 | 4 | 1 |
| 328 | 4 | 1 |
One of the course’s hardest par fours. The tee shot is long and downhill, protected by a bunker to the left and thick rough to the right. The approach leads to a slightly upward sloping green flanked by two bunkers to right and left, requiring height and accuracy with a mid- or long iron.
16
| Distance | Par | Handicap |
|---|---|---|
| 498 | 5 | 7 |
| 483 | 5 | 7 |
| 468 | 5 | 7 |
| 449 | 5 | 7 |
| 428 | 5 | 7 |
| 387 | 5 | 7 |
| 377 | 5 | 7 |
A great par five, where a good deal of strategy is needed. The tee shot to the right has to avoid the bunker on the left side. The second shot requires a long iron or wood to place the ball 50 or 60 yards from the green in order to approach it from above. The green is defended by bunkers to the front and back, and slopes from back to front.
17
| Distance | Par | Handicap |
|---|---|---|
| 146 | 3 | 17 |
| 141 | 3 | 17 |
| 126 | 3 | 17 |
| 119 | 3 | 17 |
| 106 | 3 | 17 |
| 98 | 3 | 17 |
| 90 | 3 | 17 |
Short par 3 with a broad green, where a good shot with a short iron can help you shave a point from your score. It’s best to not to miss the left on your approach.
18
| Distance | Par | Handicap |
|---|---|---|
| 426 | 4 | 3 |
| 409 | 4 | 3 |
| 386 | 4 | 3 |
| 372 | 4 | 3 |
| 347 | 4 | 3 |
| 323 | 4 | 3 |
| 301 | 4 | 3 |
Tremendous par four to finish. Perhaps the hardest hole in the course. The long, uphill hole requires a strong drive hugging the right side of the fairway, then a long iron to approach the long, crosswise green defended by a bunker on the right and a slight hollow on the left. Making par is quite a challenge!
Scorecard
| HOLES | 1 | 2 | 3 | 4 | 5 | 6 | 7 | 8 | 9 | IDA | 10 | 11 | 12 | 13 | 14 | 15 | 16 | 17 | 18 | VTA | TOT | V.C. | V.S. | |
|---|---|---|---|---|---|---|---|---|---|---|---|---|---|---|---|---|---|---|---|---|---|---|---|---|
| Negro | 389 | 168 | 345 | 491 | 350 | 186 | 390 | 407 | 493 | 3219 | 416 | 525 | 188 | 402 | 425 | 428 | 498 | 146 | 426 | 3454 | 6673 | 75.50 | 135 | |
| Blanco | 371 | 144 | 323 | 468 | 337 | 176 | 383 | 386 | 472 | 3060 | 395 | 501 | 172 | 378 | 393 | 412 | 483 | 141 | 409 | 3284 | 6344 | 73.70 | 131 | |
| Amarillo | 362 | 137 | 305 | 442 | 303 | 163 | 366 | 363 | 460 | 2901 | 387 | 470 | 155 | 356 | 376 | 387 | 468 | 126 | 386 | 3111 | 6012 | 71.90 | 126 | |
| Naranja | 340 | 129 | 300 | 427 | 288 | 153 | 340 | 355 | 439 | 2771 | 362 | 458 | 140 | 335 | 352 | 365 | 449 | 119 | 372 | 2952 | 5723 | 70.50 | 123 | |
| Azul | 332 | 121 | 274 | 398 | 267 | 138 | 333 | 341 | 428 | 2632 | 342 | 447 | 122 | 328 | 344 | 357 | 428 | 106 | 347 | 2821 | 5453 | 74.60 | 131 | |
| Rojo | 320 | 110 | 251 | 378 | 246 | 118 | 314 | 333 | 417 | 2487 | 332 | 422 | 105 | 312 | 326 | 339 | 387 | 98 | 323 | 2644 | 5131 | 72.70 | 128 | |
| Rosa | 289 | 103 | 245 | 346 | 216 | 96 | 306 | 314 | 397 | 2312 | 314 | 416 | 93 | 304 | 300 | 328 | 377 | 90 | 301 | 2523 | 4835 | 70.80 | 123 | |
| Par | 4 | 3 | 4 | 5 | 4 | 3 | 4 | 4 | 5 | 36 | 4 | 5 | 3 | 4 | 4 | 4 | 5 | 3 | 4 | 36 | 72 | |||
| HCP | 6 | 16 | 18 | 14 | 12 | 8 | 4 | 2 | 10 | 5 | 15 | 13 | 9 | 11 | 1 | 7 | 17 | 3 |